Tuesday, 25 December 2012

Bring back the dhoti to your wardrobe:

Dhoti, a traditional Indian garment meant for men, is in vogue and how. But, this time , it is woman who are hotting it up . The classic Indian dhoti is being revived by many Indian designs in contemporary designs, and its no surprise to see the likes of Priyanka Chopra ,Sonakshi Sinha , Genelia D Souza and Kiran Rao donning its modern version .


RE-INVENTING INDIAN CULTURE :

Mumbai based masaba Gupta , one of those who has worked extensively on the garment, says that her whole design aesthetic is about reviving Indian culture and that's why this was a natural step for her . She adds," why do we need to be inspired by western designs when we do have so much here!  Angarkhas , anarkali , dhotis . we just need to modify them a bit and they are ready for a modern avatar. i have designed a dhoti jumpsuit with t-shirt on top and dhoti below. its one piece creation.
Designer Payal Singhal , who is also known for her innovative take on dhotis adds," my recent fashion week collection was inspired by many adivasi tribes of India and their culture. Dhotis are Indian traditional silhouette  . you can play with the proportions of the design, you can also play around with the tops and accessories to change the look that you are aiming for.
But of many kinds of bottoms in trend right now , how does one differentiate between a harem pant, a patiala salwar and the dhoti pant ? clarifies Masaba, "the placing of the pleats on the pants distinguishes a dhoti from a patiala or a harem. they belong to the same family though and look more or less similar."

She goes on to explain, "the construction of the harem is slightly different though, the pleats are generally places waist down to mid thigh on the front. the patiala salwar uses a lot of fabric. the patiala salwar also balloons up below the knee and adds volume or ghera to the silhouette. Also harem pants are most commonly available in fabrics such as licra, stretch and thus flimsier than dhoti pants, which are generally stitched and preferred in stiffer, starchy fabrics." 


STYLING IT WELL:


You can also dress it up with a semi-formal top, statement jewellery and heels for dinner date. for a casual outing, girls can pair it with a 'Ganji' like Priyanka Chopra


Dhoti pants for peer body shape:


Dhoti pants for pear body shape

  • A pear shaped body has a heavier bottom. Dhoti pants with greater volume and extra fabric at the hips and thighs region may make you look more out of proportion. Try to wear styles that are less voluminous at the hips and thighs. Choose the ones made of lighter and flowy fabrics.
  • To enable proportion wear tops that offer volume to your upper half. Peasant tops may help your shoulders appear larger and make you appear wider at the top. You may also wear a padded blazer to make your shoulders appear proportionate.
  • Tops with flowy long sleeves may also help add proportion to your body. It may also help divert attention away from your heavy hips and bottom area.
  • Wearing dhoti pants can be quite tricky for this body type. Wear layered tops to add playfulness and volume as well.
  • Avoid wearing dhoti pants that start tapering from below the knees till the ankle as the style might highlight the heavy hips and bottom.

Dhoti pants for Apple body shape:
Dhoti pants for Apple body shape
  • Apple body shape may appear quite flattering in dhoti pants. The body shape has a heavier upper half and slimmer bottom
  • Dhoti pants may help add proportion to your body. Mid-calf length dhoti pants may serve you quite better.
  • Avoid voluminous and roomy tops with an intention to hide heavy busts. Wear simple and fitted tops. Don’t get clad too much into clothes. Don’t wear jackets as too much clothing on the upper body frame is a strict no for you.
  • Wear scarves and fancy waist chains and belts to attract attention and to create a waistline.

Dhoti pants for banana body shape:
Dhoti pants for banana body shape

  • A banana body shape may look flattering in dhoti pants. Wear the styles with great volume to add volume to your lean body. Pair them with tops that incorporate some frills, ruffles, bows, etc so as to maintain proportion.
  • Layering method is suggested when it comes to wearing tops. Cropped jackets may look flattering as well.
  • Wear ankle length styles with controlled volume to add volume o your entire vertical height.
  • Accessorize well. Wear belts or chains to define waist.

Dhoti pants for hourglass body shape:
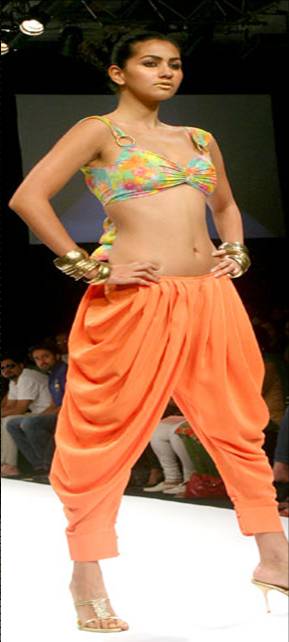
Dhoti pants for hourglass body shape

  • Almost all styles look flattering on this body type. Wear Dhoti pants with body hugging tank tops and t-shirts.
  • Keep your tops and accessories simple and let the dhoti pant  pants take the center stage.

Dhoti pants for plus size women:
Dhoti pants for plus size women

  • Plus size women may wear a dark solid colored dhoti pant with controlled volume for a slimmer look.
  • Keep the length up to your mid-calf. An ankle length may make you appear more voluminous.
  • Wear bigger prints that appear in proportion with your body-size. Avoid horizontal prints. Vertical prints may make add vertical length to your body.

Dhoti pants for petite/small women:
Dhoti pants for petite and small women

  • Petite women with smaller vertical body length may appear more diminished in the voluminous dhoti pants. The pant style may overwhelm you.
  • Wear very controlled volume and avoid all mid-calf styles. An ankle length my help you appear taller. Wear heels to add length.

Dhoti pants for tall women:
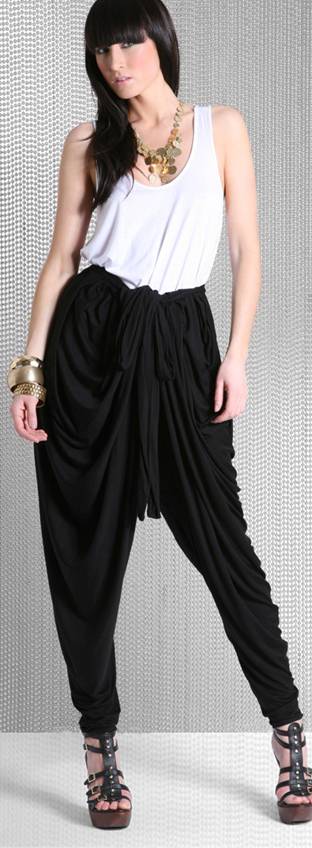
Dhoti pants for tall women

  • It seems as if the these pants were made just for you. A tall and lean body type may appear very flattering in dhoti pants.
  • Neat controlled volume as well as heavily flared styles may appear equally attractive on you. Just remember to maintain ratio.
  • An ankle-length dhoti pant may appear quite flattering on you.

Dhoti pants and footwear:
Footwear to wear with dhoti pants

  • Kolahapuris look quite ethic. Flats with some tribal print or details may add to the look.
  • Gladiators pair well with these pants and offer a retro, chic and sexy look.
  • Strappy ones with open toe as well as ankle strap styles may look quite flattering when paired with a pair of dhoti pant.
  • For those who want to add height can wear small kitten heels.
  • Other fancy fetish footwear may also add fun and playfulness to your entire look.


Saturday, 3 November 2012

the regal empress bridal look

                   THE REGAL EMPRESS


Make-Up

  • Start with a foundation to a even your skin tone. use a concealer wherever needed . To settle the foundation , use a compact powder.
  • For you eyes , use a rusted gold eye shadow on your eye lids. Start to define your eyes with black kohi and curl your lashes . Add loads of mascara.
  • For your lips,use a coral lip color and a touch of gloss to complete the look.
Hair

  • Take out a radial section (from ear front to ear front) or the fringe area with a centre parting and tuck the ends behind your ears and secure it using hair grips. Next , for the crown , tease your hair from the roots to the mid-lengths.
  • Once your hair is teased, part the hair from the centre and then start to smoothen it out from the top and give your hair the desired rise . Divide your hair into three ponytails and secure it using an elastic band . Now start teasing each length of your pony tail individually using a back comb .
  • Mould your hair in the desired shape by smoothening out the top section and spritz some hairspray.
  • To complete the look, place a maang tika on the centre of the hair parting .
    

Friday, 2 November 2012

vintage belle bridal look

            THE VINTAGE BELLE

Make-up

  • Moisturize your face well after cleansing and toning your skin.dab a concealer wherever required .Use a lightweight liquid foundation all over your face and neck.powder your face with a translucent compact.
  • Namrata soni ,make-up expert says ," use a gel liner in brown and gold swirl and apply it all over your eyes extending outwards like a wing to the bottom of your waterline. use at least two or three coats of  mascara". For your lips opt for a coral or a bright pink lipstick. Add for your cheeks, use a coral or a pink mousse blush to add color. Place a big red bindi on your forehead.
Hair

  • Apply styling mousse on dry hair . Paddle brush your hair to smoothen it out. take out a radical section from ear to ear and make a side parting. With a large curling tong . Curl your front fringe. Take a thick horizontal section of your hair from the front and create a big S-shaped wave.
  • Tease your hair and smoothen it from the top and tuck this section behind your ears. For the rest of your hair, tie your hair into a side ponytail ,and then tease the mid-length of your hair to create a volume. Use a hairspray to keep flyaway at bay. Accessorize your hair.

Monday, 1 October 2012

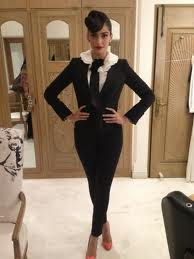
Necktie turns feminine

Neck tie turns feminine:

Women are borrowing from the boys in a way that blurs the gender gap , and their latest weapon in a men's wear staple-the necktie

ORIGINS: 
Diane Keaton's iconic vest and tie in Annie hall , the 1977 classic film directed by woody Allen , and Hollywood actress Marlene dietrich's androgynous suits and ties.


COMEBACK IN:
Fall winter 2012 collections by Miu Miu & Ralph Laurel


EVOLVED INTO:
A crisp button-down and tie combo paired with a feminine , ankle length skirt , and a tailored short suit with bare legs and strappy peep-toe sandals.

SPOTTED ON:
International style icons like freida pinto and Victoria Beckham , Indian actresses Sonam kapoor and Kangana ranaut.


WHAT WE LOVE:
A sweater with an embellished sequin tie , spotted on Jessica Alba , is a quirky alternative to the basic shirt & tie combo. when a women wears a tie , it never fails to catch the eye. 


HOW TO SPORT IT:
A sparkly short tie glams up a cute one-piece. wear a skinny tie with a fitted shirt or on a waistcoat. diagonal stripe designs are simple yet classy and elegant.
Accessories-like dangling earrings , mirrored sun glasses and stacks of bracelets-jazz up a masculine pantsuit.


WHAT NOT TO DO:
Avoid looking like you are trying to dress like a man. avoid buttoned collars. a check shirt and check tie combo is a big no. don't let the back tip of tie show. if you strain your tie buy a new one. never ever send a tie to the laundry. loose ties around the neck can look hip but you want class , tie it tight.

Wednesday, 19 September 2012

easiest application of acrylic nails


 A step by step guide and helpful hints and tricks to applying your own acrylic nails as well as using nail polish.

Great for those of us who like the look of acrylic nails but hate to spent the expensive price going to the nail salon every 2 weeks.

Do it yourself and save money during this economic pinch. This is a free how to !

This application should hold for 5 to 10 days depending on how fast your natural nails grow and what sort of condition you are putting your nails through. This will be a beautiful manicure - almost just as good as salon quality with practice.

Like all things, applying your own acrylics does take a little practice. My first time wasn't bad, but it also wasn't the best, my second time doing it came out much better and I can only see it getting better and better each time I do it. Also learn how to apply nail art and designs!

Tuesday, 18 September 2012

Nail Art Collection by smART nails


When placing the sticker on an existing nail polish, make sure that it is totally dry.

1. Gently peel off one square shape from the supporting paper.
2. Stick it to the pillow of your finger (skin side) a couple of times in order to 
reduce 
the intensity of the glue, thus avoiding marks being left on the existing nail 
polish 
layer.
3. Place the shape in the desired angle and location on the nail. Make sure 
that it is 
flat and well stuck in all areas covering the nail.
4. Apply a moderate layer of contrasting nail polish on the area where the cut
 out 
shape is. Do not let it go over the borders of the sticker.
5. Peel off the sticker immediately after applying the nail polish. Do it slowly 
and 
carefully, not to twist the sticker and damage the shape
6. Replace sticker on backing sheet and clean with a small amount of nail 
varnish 
remover, so it is ready to use again.

Nail Art Foils Tutorial


Nail foil is simple to use and will make your nails look stunning! 
From plain and patterned foils to holographic foil designs that will 
create a more dramatic look, we have a range of over 40 foils to 
choose from so the selection and quality is fantastic!
1. Paint your nails with 1-2 coats of your chosen nail polish, 
ideally the polish colour would be one close to the colour of the 
foil design being used, this helps mask any imperfections that may 
occur.
2. Paint on a smooth thin and even layer of the foil adhesive to the 
area you wish to cover with nail foil, notic how the foil adhesive is 
a blue colour when applied.
3. Wait for the foil adhesive to go completely clear and tacky.
4. Place matt side of the nail foil over the area you have put foil 
adhesive on (foil must be shiny side up).
5. Rub the nail art foil firmly all over to release it from it from
its backing, you must really make sure that you rub thoroughly use a 
cotton bud, tip of your finger or something similar to get into all 
the edges.
6. Once the design has been thoroughly smoothed over, quickly pull 
(snap) off the foil to reveal your finished design.
7. To seal your design, use 1-2 layers of nail art finishing sealer 
(finishing sealer does not have the wrinkling effect like allot of 
top coats, if you wish to use a top coat, make sure it is a basic 
slow drying top coat and not a quick dry top coat.

How To Apply Rhinestones, Gems, Pearls, Confetti & Charms


1. Apply a layer of top coat to your nail.
2. Using a cuticle pusher/orange stick or even a picker upper, dab the end either into the applied top coat on your nail gently or into a little dappen dish of water, this helps pick up rhinestones, gems, pearls etc, place your desired accessory on to your nail repeating the previous steps for each accessory you wish to place on your nail/s
3. Small charms, flat shapes and rhinestones, can be placed onto a wet layer of top coat, but large charms will have to be glued on, so you would have to wait for the first layer of top coat to dry fully, before placing a small drop of glue on the desired place on your nail and then placing the charm on top.
3. Finish with another 1-2 coats of top coat or nail art finishing sealer, to finish and seal your nail art accessories.

Saturday, 18 August 2012

INDIAN TRADITIONAL LEHENGAS


Indian Lehenga:

Lehengas are popular among Indian brides and have been the preferred wedding outfit since many years. Traditionally all lehengas used to have an more full cut but with changing trends in bridal fashion, now a days you get an array of options. Today lehengas are available in various cuts and styles to suit every body type.  They look graceful and elegant and can be tailor made or bought off the rack. Here are some tips which may come in handy while selecting a lehenga.


Lehenga Style for various body types:


Fish cut lehenga:

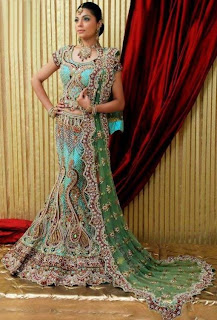
This style is fitted till the knee and then flares out to the bottom. It fits well on the hips and is hence recommended for women with a curvaceous or an hourglass figure. It is also known as a mermaid lehenga as it resembles the tail of a mermaid.


Here is the fish cut lehenga of lux green color. Its heavy embroidery gives it a elegant and classy look.


Here is an another awesome lehenga with heavy embroidery. It looks perfect on bride. It leaves a very classy impression on others.


here are few other designer wear fish cut lehengas


Straight-cut lehenga:
This cut resembles a wrap around skirt and is straight from the waist to the hem. It has slits on the side for ease of movement. This can complement most body types and creates an illusionary slimming effect. Soft fabrics are advisable for this style.


A – Line Lehenga:

In this style, the skirt flares from the waist to the hem resembling the alphabet A. It has a little flare and will fit thin as well as pear shaped brides.


Panel Length lehenga:

This style is flattering and offers the right amount of flare. These are quite popular as they create a slimming effect. This comprises of a number of panels sewn together. The panels can either be of the same fabric or colour or you can use a combination of fabrics with contrasting colors.


Circular or Flared Lehenga:

This style has a large circumference along with lots of pleats near the waist. This adds volume looks very classy. This style will best suit thin brides. Flowy fabric with a good fall can be used to stitch this type of lehenga.


There are plenty of variations to the traditional lehenga – Lancha and Sharara. A Lancha has a long blouse (Choli) which almost comes down a few inches below the hip while in a Sharara the skirt is divided vertically with stitches in the center. The Sharara is quite common among Muslim brides. The similarity between all the three outfits is that they are three piece outfits comprising of a blouse, long skirt and a dupatta and are very popular wedding outfits.